sky factory texture mip map and upload
Texture Import Settings
Switch to Scripting
The Texture Import Settings window defines how Unity imports images from your project'south Assets binder into the Unity Editor.
To admission this window, select the prototype file in the Projection window A window that shows the contents of your Assets folder (Project tab) More info
See in Glossary . The Texture Import Settings window appears in the Inspector A Unity window that displays information about the currently selected GameObject, nugget or project settings, assuasive you to audit and edit the values. More than info
Meet in Glossary .
Note: Some of the less commonly used properties are hidden by default. Aggrandize the Advanced section in the Inspector window to view these backdrop.
There are several sections on the Texture Import Settings window:
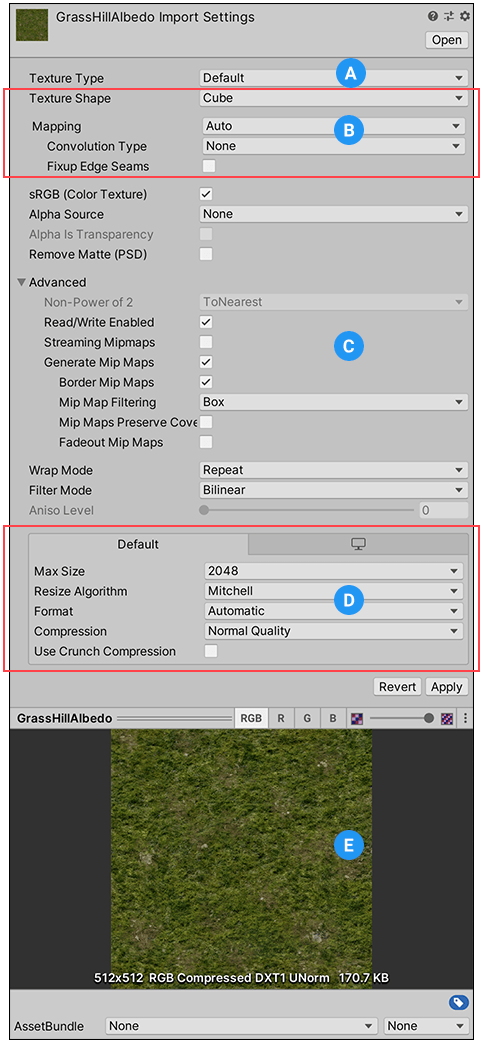
(A) Texture Type. Select the type of Texture yous want to create.
(B) Texture Shape. Select the shape and set backdrop specific to that shape in this area.
(C) Type-specific and advanced settings. Depending on what Texture Type value yous select, extra backdrop might appear in this area. For more information, come across the documentation on Texture types.
(D) Platform-specific overrides. Use the Platform-specific overrides panel to set default options and their overrides for a specific platforms.
(Eastward) Texture preview. You tin preview the Texture and accommodate its values here.
Texture Type
Use the Texture Type holding to select the type of Texture you want to create from the source prototype file. The other backdrop in the Texture Import settings window change depending on the value you set.
For information almost specific Texture Types, encounter the Texture Types documentation.
| Property: | Function: |
|---|---|
| Default | This is the most common setting used for all Textures. It provides access to most of the properties for Texture importing. For more information, meet the Default Texture type. |
| Normal map A type of Bump Map texture that allows you lot to add surface detail such equally bumps, grooves, and scratches to a model which take hold of the low-cal as if they are represented by existent geometry. See in Glossary | Select this to turn the colour channels into a format suitable for real-fourth dimension normal mapping. For more information, see the Normal map Texture blazon documentation. For more information on normal mapping in general, see Importing Textures. |
| Editor GUI and Legacy GUI | Select this if you are using the Texture on whatever HUD or GUI controls. For more than information, see the Editor GUI and Legacy GUI Texture type documentation. |
| Sprite (2D and UI) | Select this if you are using the Texture in a 2D game as a SpriteA 2nd graphic objects. If you are used to working in 3D, Sprites are essentially just standard textures just at that place are special techniques for combining and managing sprite textures for efficiency and convenience during development. More info See in Glossary . For more than data, meet the Sprite (second and UI) Texture type documentation. |
| Cursor | Select this if you are using the Texture as a custom cursor. For more information, see the Cursor Texture type documentation. |
| Cookie | Select this to set your Texture up with the basic parameters used for the Cookies of your Scene A Scene contains the environments and menus of your game. Think of each unique Scene file as a unique level. In each Scene, you place your environments, obstacles, and decorations, essentially designing and building your game in pieces. More info See in Glossary 's Lights. For more data, run into the Cookie Texture type documentation. |
| Lightmap A pre-rendered texture that contains the furnishings of calorie-free sources on static objects in the scene. Lightmaps are overlaid on top of scene geometry to create the upshot of lighting. More info See in Glossary | Select this if you are using the Texture as a Lightmap. This pick enables encoding into a specific format (RGBM or dLDR, depending on the platform) and a post-processing A process that improves product visuals by applying filters and effects before the image appears on screen. You can use post-processing effects to simulate physical camera and film backdrop, for example Bloom and Depth of Field. More info post processing, postprocessing, postprocess See in Glossary stride on Texture data (a push-pull dilation laissez passer). For more information, run across the Lightmap Texture type documentation. |
| Unmarried Channel | Select this if yous only need one aqueduct in the Texture. For information on the properties available just for the this type, encounter the Single Channel Texture blazon documentation. |
Texture Shape
Use the Texture Shape property to select and define the shape and construction of the Texture. There are four shape types:
- 2nd is the most mutual setting for all Textures; it defines the image file as a second Texture. These are used to map Textures to 3D Meshes and GUI elements, amongst other Projection elements.
- Cube defines the Texture as a cubemap. Y'all could use this for Skyboxes or Reflection Probes A rendering component that captures a spherical view of its surroundings in all directions, rather like a camera. The captured image is and then stored as a Cubemap that can be used by objects with reflective materials. More info
Run across in Glossary , for example. This blazon is only available with the Default, Normal Map, and Unmarried Channel Texture types. - second Array defines the Texture as a 2d array texture. This is commonly used as an optimization for some rendering techniques, where many textures of the same size & format are used.
- 3D defines the Texture equally a 3D texture. 3D textures are used by some rendering techniques to correspond volumetric data.
Cubemap mapping
You tin further refine Cubemap A drove of half-dozen square textures that tin can represent the reflections in an environment or the skybox drawn behind your geometry. The 6 squares grade the faces of an imaginary cube that surrounds an object; each face represents the view along the directions of the world axes (up, down, left, right, forwards and back). More info
See in Glossary shape textures with the following backdrop:
| Holding: | Function: | |
|---|---|---|
| Mapping | Use Mapping to specify how the Texture is projected onto your GameObject The cardinal object in Unity scenes, which can represent characters, props, scenery, cameras, waypoints, and more. A GameObject'southward functionality is defined past the Components fastened to it. More info See in Glossary . This is set to Auto past default. | |
| Motorcar | Unity tries to create the layout from the Texture information. | |
| 6 Frames Layout (Cubic Environs) | The Texture contains six images arranged in i of the standard cubemap layouts: cross, or sequence (+x -x +y -y +z -z). The images tin be orientated either horizontally or vertically. | |
| Latitude Longitude (Cylindrical) | Maps the Texture to a 2nd Latitude-Longitude representation. | |
| Mirrored Brawl (Sphere Mapped) | Maps the Texture to a sphere-like cubemap. | |
| Convolution Type | Choose the type of pre-convolution (filtering) that you want to apply for this Texture. The consequence of pre-convolution is stored in mips. This property is only available for the Default Texture type. | |
| None | The Texture has no pre-convolution (no filtering). This is the default. | |
| Specular (Glossy Reflection) | Select this to utilise cubemaps as Reflection Probes. The Texture mip maps are pre-convoluted (filtered) with the engine BRDF. For more data, encounter Wikipedia's folio on Bidirectional reflectance distribution role. | |
| Diffuse (Irradiance) | The Texture is convoluted (filtered) to represent irradiance. This is useful if you use the cubemap every bit a Light Probe Light probes store information virtually how light passes through space in your scene. A collection of light probes bundled within a given infinite can improve lighting on moving objects and static LOD scenery within that space. More info Encounter in Glossary . | |
| Fixup Edge Seams | This option is only available with the None or Diffuse convolution (filter). Use this on low-end platforms every bit a work-effectually for filtering limitations, such every bit cubemaps incorrectly filtered between faces. | |
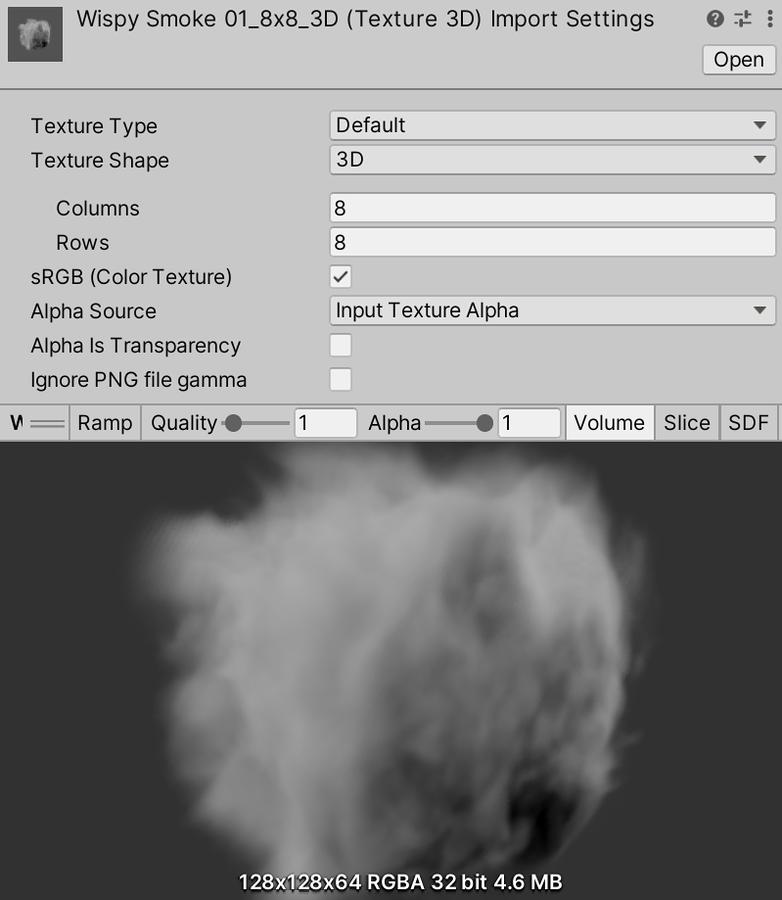
second Array and 3D columns and rows
The source texture files for second Array and 3D Textures are divided into cells; these textures are called flipbook textures. When Unity imports flipbook textures, it places the contents of each cell into its own 2D array layer or 3D texture slice.
When you fix the Texture Shape property to 2d Array or 3D, Unity displays the Columns and Rows backdrop. Use these to tell Unity how to separate the flipbook texture into cells.
| Property: | Function: |
|---|---|
| Columns | The number of columns that the source flipbook texture is divided into. |
| Rows | The number of rows that the source flipbook texture is divided into. |
For case, an image with 8x8 cells of fume event frames looks like this as a default 2D texture:

But when y'all correctly import is as a 3D texture with 8 Columns and eight Rows, it looks like this:
Type-specific and advanced settings
Depending on which Texture Type you select, different options might appear on the Texture Import Settings window. Some of these options are specific to the Texture Type itself, such as the Sprite Mode settings available with the Sprite (2D and UI) type.
The Avant-garde settings allow you to brand effectively adjustments to the way Unity handles your Texture. The order and availability of these settings might vary slightly depending on the Texture Type y'all choose.
| Property: | Description: | Supported by: | |
|---|---|---|---|
| sRGB (Color Texture) | Enable this property to specify that the Texture is stored in gamma infinite. This should always be checked for non-HDR colour Textures (such as Albedo and Specular Colour). If the Texture stores data that has a specific significant, and you need the exact values in the Shader (for example, the smoothness or the metalness), disable this property. This property is enabled by default. | Default, Sprite (2nd and UI) | |
| Alpha Source | Specify how the alpha channel of the Texture is generated. This is set to None by default. | Default, Editor GUI and Legacy GUI, Sprite (second and UI) Cursor Cookie Single Channel | |
| None | The imported Texture does not have an alpha aqueduct, whether or non the input Texture has one. | ||
| Input Texture Alpha | This uses the blastoff from the input Texture if a Texture is provided. | ||
| From Gray Calibration | This generates the alpha from the mean (average) of the input Texture RGB values. | ||
| Blastoff is Transparency | Enable this property to amplify the colour and avoid filtering artifacts on the edges if the alpha channel y'all specify is Transparency. | Default, Editor GUI and Legacy GUI, Sprite (2D and UI) Cursor Cookie Single Aqueduct | |
| Remove Matte (PSD) | Enable special processing for Photoshop files that use transparency (blending color pixels with white). Annotation: This is only bachelor for PSD files. | Default, Editor GUI and Legacy GUI, Sprite (2D and UI) Cursor Cookie Single Channel | |
| Ignore PNG file gamma | Enable this property to ignore the Gamma attribute in PNG files. This belongings does not consequence other file formats. | All Texture Types | |
| Non Ability of 2 | If the Texture has a not-power of two (NPOT) dimension size, this defines a scaling behavior at import fourth dimension. Encounter documentation on Importing Textures for more information on not-power of 2 sizes. This is set to None past default. | Default, Normal map Editor GUI and Legacy GUI, Cursor Cookie Lightmap Single Channel | |
| None | Texture dimension size stays the same. | ||
| To nearest | Scale the Texture to the nearest power-of-ii dimension size at import time. For example, a 257x511 px Texture is scaled to 256x512 px. Note that PVRTC formats require Textures to be square (that is width equal to height), so the final dimension size is upscaled to 512x512 px. | ||
| To larger | Scale the Texture to the ability-of-ii dimension size of the largest dimension size value at import time. For instance, a 257x511 px Texture is scaled to 512x512 px. | ||
| To smaller | Scale the Texture to the power-of-ii dimension size of the smallest dimension size value at import time. For example, a 257x511 px Texture is scaled to 256x256 px. | ||
| Read/Write Enabled | Enable this property to access the Texture data from scripts using Texture2D.SetPixels, Texture2D.GetPixels and other Texture2D methods. Internally, Unity uses a copy of the Texture data for script access, which doubles the amount of retention required for the Texture. This property is therefore disabled by default, and y'all should enable it only if y'all require script admission. For more information, see Texture2D. | All Texture Types | |
| Virtual Texture Only | Enable this property to use the Texture solely in combination with a Texture Stack for Virtual Texturing. When enabled, the texture is not guaranteed to exist available as a Texture2D in the Player (that is, non accessible from a script). When disabled, the Histrion includes the texture both equally a Texture2D (attainable from script) and as a streamable texture in a Texture Stack. | Default, Normal map | |
| Streaming Mip Maps | Enable this property to utilise Mip Map Streaming on this Texture. This setting is valid for whatsoever Texture in the 3D environs that Unity displays with a Mesh Renderer. Lengthened Textures, normal maps and light maps are all valid for Mip Map Streaming. | Default, Normal map Lightmap Single Channel | |
| Mip Map Priority | Use this to set the priority of the mipmap. Unity uses this to determine which mipmaps to prioritize when assigning resources. College values correspond a college priority (for case, iii is a college priority than i). This setting is only bachelor when Streaming Mip Maps is enabled. The Mip Map Priority number is also a mipmap offset for the Memory Budget (gear up in the Quality Settings when Texture Streaming is enabled). For example, with a priority of 2, the Mip Map Streaming system tries to use a mipmap ii mip levels higher than Textures with a priority of 0. One mip level higher is 2x in each axis and ii levels college is 4x in each axis, and so ii mip levels higher results in a texture 16x larger. If information technology can't do this, it uses a lower mip level to fit the Memory Budget. Negative values are likewise valid. See Mip Map Streaming API for more details. | ||
| Generate Mip Maps | Enable this property to enable mip map generation. Mip maps are smaller versions of the Texture that become used when the Texture is very small-scale on screen. See documentation on Importing Textures for more data on mip maps. Alert: Every time yous select a new Texture Blazon, this property reverts to the default for the new Texture Blazon, if defined. Encounter Texture types to notice this property'due south default value for each type. | All Texture Types | |
| Edge Mip Maps | Enable this holding to avoid colors bleeding out to the edge of the lower MIP levels. Used for light cookies (encounter below). This belongings is disabled by default. Simply bachelor when Generate Mip Maps is enabled. | ||
| Mip Map Filtering | There are two means of mipmap filtering available for optimizing image quality. The default option is Box. Only available when Generate Mip Maps is enabled. | ||
| Box | This is the simplest way to fade out mipmaps. The MIP levels become smoother every bit they go down in dimension size. | ||
| Kaiser | A sharpening algorithm runs on the mipmaps every bit they become downward in dimension size. Try this pick if your Textures are likewise blurry in the distance. (The algorithm is of the Kaiser Window blazon; see Wikipedia for further information.) | ||
| Mip Maps Preserve Coverage | Enable this property if y'all want the blastoff channel of generated mipmaps to preserve coverage during the blastoff exam. See TextureImporterSettings.mipMapsPreserveCoverage for more information. Only bachelor when Generate Mip Maps is enabled. | ||
| Alpha Cutoff Value | Set the reference value for controlling the Mip Map coverage during the alpha test. | ||
| Fadeout Mip Maps | Enable this property to make the mipmaps fade to gray every bit the MIP levels progress. This is used for detail maps. The left-most roll is the commencement MIP level to brainstorm fading out. The right-virtually gyre defines the MIP level where the Texture is completely grayed out. But available when Generate Mip Maps is enabled. | ||
| Wrap Fashion | Select how the Texture behaves when tiled. The default selection is Echo. | All Texture Types | |
| Repeat | Repeats the Texture in tiles. | ||
| Clamp | Stretches the Texture's edges. | ||
| Mirror | Mirrors the Texture at every integer purlieus to create a repeating pattern. | ||
| Mirror In one case | Mirrors the Texture one time, then clamps information technology to edge pixels. Annotation: Some mobile devices do not back up Mirror Once mode. In this case, Unity uses the Mirror mode instead. | ||
| Per-axis | Choose this to individually control how Unity wraps Textures at the U axis and V axis. | ||
| Filter Mode | Select how the Texture is filtered when it gets stretched by 3D transformations. The default selection is Bilinear. | All Texture Types | |
| Point (no filter) | The Texture appears blocky upwards close. | ||
| Bilinear | The Texture appears blurry upwards close. | ||
| Trilinear | Similar Bilinear, only the Texture too blurs between the unlike MIP levels. | ||
| Aniso Level The anisotropic filtering (AF) level of a texture. Allows you to increment texture quality when viewing a texture at a steep bending. Skillful for floor and ground textures. More info See in Glossary | Increases Texture quality when viewing the Texture at a steep angle. Anisotropic filtering is skilful for flooring and basis Textures but comes at a loftier performance cost. See documentation on Importing Textures for more information on Anisotropic filtering. | All Texture Types | |
Platform-specific overrides
When edifice for unlike platforms, you demand to think about the resolution, the file size with associated memory size requirements, the quality of your Textures, and what compression format to utilise for each target platform. The Platform-specific overrides panel provides i tab for the Default options, and ane tab for every target platform you are edifice for. Some texture import settings tin can also be overridden globally in Build Settings, mostly to speed upward iteration time during development.
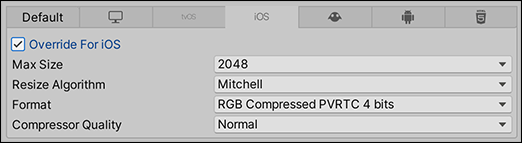
To fix override values:
- Fix the default backdrop on the Default tab.
- Navigate to a specific target platform tab and enable the Override for <target-platform> selection.
- Set the override properties.
The following table describes which properties are available:
| Property: | Function: | |
|---|---|---|
| Max Size | Prepare the maximum imported Texture dimensions in pixels The smallest unit in a figurer image. Pixel size depends on your screen resolution. Pixel lighting is calculated at every screen pixel. More than info See in Glossary . Artists often adopt to work with huge dimension-size Textures, only you can scale down the Texture to a suitable dimension-size. | |
| Resize Algorithm | Choose an algorithm for downscaling the Texture when the Texture dimensions are larger than the specified Max Size. | |
| Mitchell | Resize the Texture using the Mitchell algorithm. This is the default resize algorithm. | |
| Bilinear | Resize the Texture using bilinear interpolation. For images where modest, precipitous details are of import, this can preserve more of these details than Mitchell. | |
| Format | Bypass the automatic system to specify what internal representation to use for the Texture. The list of available formats depends on the platform and Texture type. For more information, see Texture formats for platform-specific overrides. Notation: Fifty-fifty when yous don't override a platform, this option shows the format called by the automatic system. This belongings is only bachelor when overriding for a specific platform, and not equally a default setting. | |
| Compression A method of storing data that reduces the amount of storage infinite information technology requires. See Texture Pinch, Animation Compression, Audio Pinch, Build Compression. Run across in Glossary | Choose the compression blazon for the Texture. This helps Unity cull the right compression format for a Texture. Depending on the platform and the availability of compression formats, different settings might end upwards with the aforementioned internal format. For instance, Depression Quality Compression affects mobile platforms, but not desktop platforms. | |
| None | Exercise not compress the Texture. | |
| Depression Quality | Compress the Texture in a low-quality format. This might utilise less memory than Normal Quality. | |
| Normal Quality | Compress the Texture using a standard format. | |
| High Quality | Shrink the Texture in a high-quality format. This might apply more retentiveness than Normal Quality. | |
| Use Crisis Compression | Utilise crisis compression, if applicative. Crunch is a lossy compression format on top of DXT or ETC Texture compression 3D Graphics hardware requires Textures to be compressed in specialized formats which are optimized for fast Texture sampling. More info See in Glossary . Unity decompresses Textures to DXT or ETC on the CPU and and then uploads them to the GPU at runtime. Crunch compression helps the Texture use the lowest possible amount of space on disk and for downloads. Crunch Textures tin can take a long time to shrink, simply decompression at runtime is very fast. | |
| Compressor Quality | When using Crisis Texture pinch, utilise the slider to adjust the quality. A college compression quality means larger Textures and longer compression times. Annotation: For Android platforms, the Compressor Quality values provide slightly dissimilar options. For more information, run across Texture formats for platform-specific overrides. | |
| Split Alpha Aqueduct | Allows alpha splitting for this Texture on these platforms: tvOS, iOS Apple tree'southward mobile operating system. More info See in Glossary , Lumin, and Android. For more information, see the Notes on Android for Texture compression formats. | |
| Override ETC2 fallback | ETC2 texture decompression fallback override on Android devices that don't support ETC2. Allows to choose which texture format to decompress the texture to on Android devices that have no ETC2 texture format support. For more information, see the Notes on Android for Texture compression formats. | |
- Crunch compression format updated in 2017.3 NewIn20173
- Ignore PNG file gamma added in 2020.1 NewIn20201
Source: https://docs.unity3d.com/Manual/class-TextureImporter.html
0 Response to "sky factory texture mip map and upload"
Post a Comment